PiView
![]()
PiView is the tool connecting Maya and Unreal Engine viewport. Once PiView is launched and connected, any changes of the transformations and parameters of the models, cameras and lights will be reflected instantly in the customized Unreal Engine viewport. With PiView, you are able to see the final rendering output in real-time while editing the shot in Maya.
PiView shows the basic UI elements when launched.
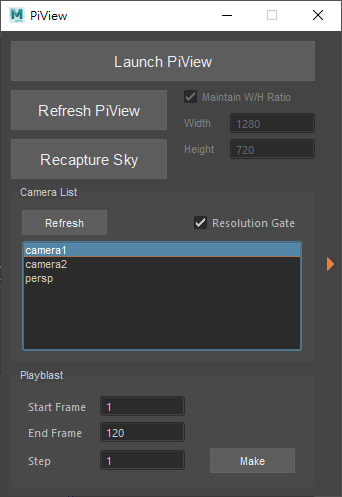
Click the orange triangle on the right to reveal more features.
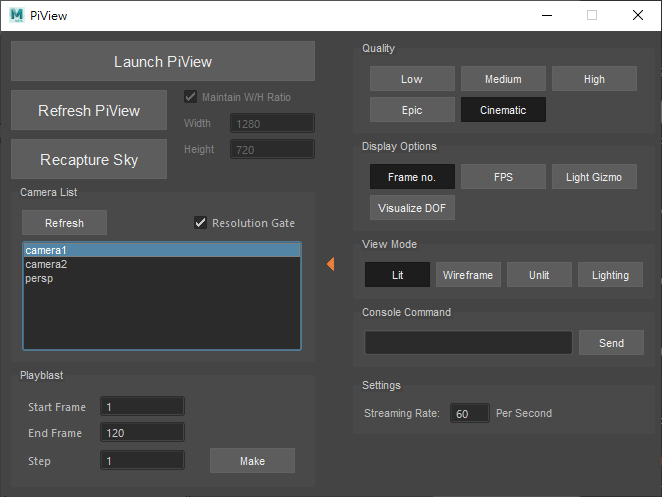
PiView usage:
Launch PiView button

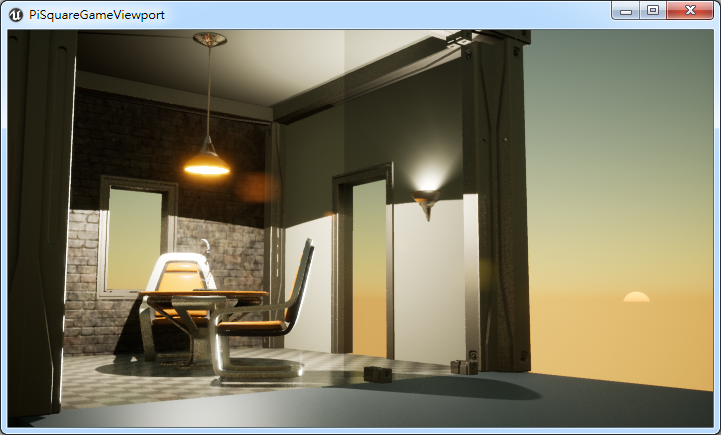
PiView is a special Unreal Engine viewport receiving attribute values streamed from Maya so actors, lights and cameras can be synced between the two.
If it is the first time you open the shot, it may take some time to compile shaders before you see the complete shot.
Once the shot is opened in PiView, you can modify many attributes in Maya and see how they change in PiView.
Refresh PiView button

When you add or delete actors (e.g. a point light or a static asset), PiView doesn’t reflect the changes until you press this “Refresh PiView” button. It’s also used for recapturing the scene for the sky light when the environment of the shot is modified. In “Preferences”, you can turn on “Auto refresh PiView when add/remove lights or assets” to make this an automatic response.
Recapture Sky

This button is for capturing the current scene as the sky lighting source. When you modify a directional light with “Atmosphere Sun Light” option turned on (the light affecting the sun position), it is suggested to recapture the sky to better reflect the scene’s lighting. The screenshots below show how the scene looks before(top) and after(bottom) executing “Recapture Sky”.
Notice that only one directional light can affect the sun. If “Atmosphere Sun Light” options are on in more than one directional lights, the system will just use the first one found.

Launch Resolution

Set the initial resolution of PiView when it’s launched.
- Maintain W/H Ratio: This option locks the aspect ratio of width to height.
- Width/Height: Set the initial width and height of PiView window in pixels.
Camera List

All the cameras in the current shot will be listed here. You may switch the camera view in PiView by clicking a camera on the list. If you add or delete cameras in Maya, press the “Refresh” button to refresh the camera list.
In Maya, the dimensions of the Resolution Gate represent the rendering resolution (the region to be rendered). Turn this option on to display the renderable area in PiView that matches with the one in Maya.
Playblast
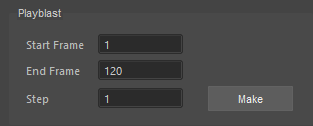
Playblast outputs the screenshots from PiView frame by frame as a sequence of image files. This provides a quick way to render a shot without having to convert it into umap first.
Start/End: the playblast output range. The Start/End frames reflect Maya’s timeline settings by default.
Step: this is the number of images to capture for each frame. If step = 1, capture each frame. If step = 2, capture every 2nd frame, etc.
Make: Click this button to start making a playblast.
Playblast captures the current display of PiView. If PiView window was resized after launched, the captured image size could be different from the initial settings. If you want to output images in a specific resolution other than the current PiView window size, close PiView, set the “Launch Resolution” as you want (10000x10000 pixels maximum), launch PiView and then do playblasting.
The output images can be found in: C:\PiSquare\PiStage\Unreal\PiSquareGame\Saved\Screenshots\Windows
Note: Some effects like motion blur or cloth/physics simulations will be inactive or incorrect in Playblast outputs. Use PiRender for final outputs.
Quality

These are options for setting the real-time rendering quality of PiView. When you are using less powerful hardware, selecting a lower rendering quality setting may help you keep a good frame rate. The settings here won’t affect the rendering quality of PiRender which always renders the final output with Cinematic quality.
Display Options
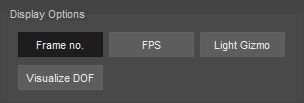
Here are some display options for PiView:
Frame no.: displays the current frame number.
FPS: displays the current PiView frame rate. (This is not the Maya frame rate, but the UE4 drawing rate)
Light Gizmo: shows light gizmos so you may examine the positions and types of lights in the shot.
Visualize DOF: Visual aid to help in setting depth of field from camera post-process.
Note: Light Gizmos displayed in PiView may affect the bloom and lens flare effects, especially when the light intensity values are high.
View Mode

Four rendering modes are available for PiView:
Lit: shows the final result of the scene with all of the materials and lighting applied.
Wireframe: shows all of the polygon edges in the scene.
Unlit: removes all lighting from the scene and shows Base Color only.
Lighting: shows meshes with a neutral material affected by lighting.
Console Command

You can type here any UE4 console command. Press the “Send” Button to execute it. Please refer to UE4 documentation for more details.
Stat Commands: https://docs.unrealengine.com/latest/INT/Engine/Performance/StatCommands/index.html
Scalability Reference: https://docs.unrealengine.com/latest/INT/Engine/Performance/Scalability/ScalabilityReference/
Streaming Rate

Set the streaming frame rate here. The default value is 60. You can set a higher value to get smoother animations on a powerful machine or lower values on a weaker system.